Rocket Bra Tutorial
This post may contain affiliate links. Read about our privacy policy.
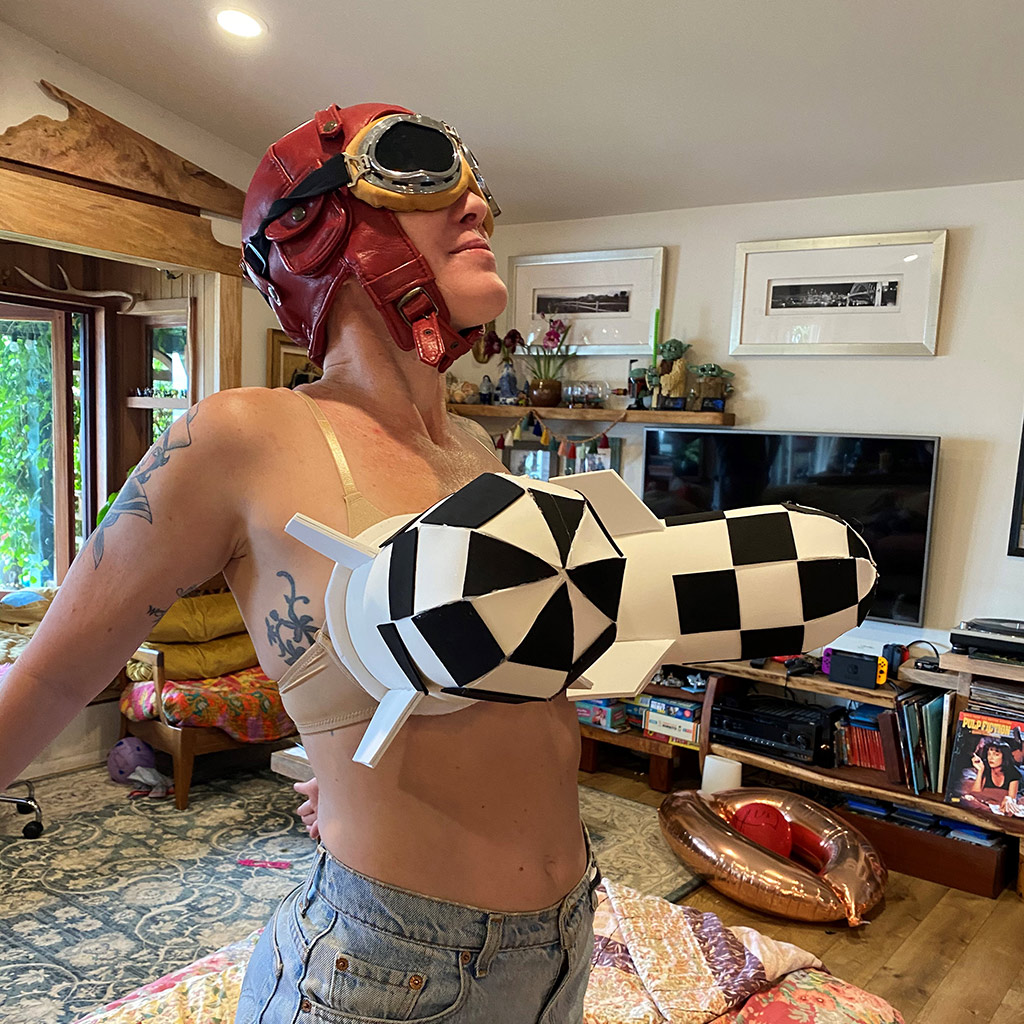
 Lily O Lei turned 40 last month and had a “Tank Girl” themed birthday party since she chose to mark the occasion with an extremely short haircut. In support of her new ‘do Miss F-Bomb asked if I could make her this bra as a gift from Cabaret & Cocktails:
 And I said sure!
After a couple mock ups I threw this together:
Sadly I did not take pictures along the way, so this tutorial may be a bit of a challenge, but I will do my best to explain the process.
Disclaimer – I’ve only done this once, so there are likely ways to improve upon the design and assembly. Please don’t think this is the only way it could/should be done.
If you try this out and figure out better ways to do things please post them in the comments.
Materials
Pattern: Download the pattern PDF here This is a pattern I made up after the fact. The one I used to make the rockets for Lily I drew by hand. Feel free to adjust the shape of the point – I think the rockets I made are a little too round at the top – and this pattern is just an approximation of the shape I drew by hand.

The main thing I tried to capture in the template and the instructions was how to get the Tank Girl checker pattern. So if you’re going for the checker pattern and want to change things I wouldn’t adjust the dimensions too much, just maybe play with the shape. If you don’t want to do the checker pattern feel free to adjust the dimensions of the point however you see fit.

If you’ve got significantly bigger boobs the rockets will need to be larger unless you’re not as concerned about covering the whole boob with the rocket – up to you. I’ll get into ides of how to adjust the pattern for a larger rocket at the end of the blog.
You’ll also need craft foam for the base and fins. The base is just a ring around the bottom of the rocket to match the picture. Could be left out if you want, though it does help to support the fins. I used a thicker craft foam for the base and fins. In this version the base and fins are the same color as the rocket body, but you could make those a contrasting color for a different design.
You’ll also need contrasting color craft foam for the checkers. You can always do these with a sharpie instead, or leave them out if you prefer or try for different patterns or designs on your rocket. Totally up to you. In my mock up I drew on the checkers with sharpie – it worked out fine, but I wanted a sharper look so I went with the contrasting foam in the final version. Feel free to have fun with the design and post pictures in the comments.

Bra: I had hoped to get a white bra to match the rockets, but couldn’t find one in the right size that was within my budget. I think the nude worked out really well. I’d recommend getting a bra with the foam, structured cups so that they help to support the rockets.
Other: Pencil for tracing the pattern. Scissors for cutting the pattern and the foam. Needle and thread for sewing the rockets to the bra. Cold water for hot glue burns. Cocktail for hot glue burn recovery.
Assembly
Print out the instructions and cut out the rocket shape template (all three sections together – don’t separate them yet). With your craft foam sheet in the landscape orientation trace the top of the template with the top of the rocket at the top of the sheet – you want to end up with a picket fence type pattern with 9 “pickets” like this:

NOTE: the bottom of the template is NOT the bottom of the rocket. The template is just to get the top shape of the pickets and it does not represent the final size of the rocket.
To make sure your pickets are nice an even you can give yourself a couple grid lines to follow (make sure any lines you draw are easy to cover up with your checkers):
- With a straight edge draw a line across the middle of the foam sheet halfway up (6” from top and bottom). You can align the bottom of the template with that. It will also be a guideline for the checkers since the squares will line up above and below that line.
- Mark out every 2 inches along that line so you know you’ve got the pickets in the right spacing.
Once you’ve got your pickets drawn cut off the top of the sheet around the points so your sheet looks like the picture above.
At this point you can cut the template into the 3 parts and cut out the contrasting color blocks for the checker pattern. Be sure to leave a “picket” on one end bare since it will be overlapped when you glue the whole thing together. See figure below for what the checker pattern should look like – the blue section below represents what should be bare.

At this point you are ready to glue the rocket together. You’ll make a cylinder by gluing the end picket (with checkers) over the bare picket, overlapping it completely.
To make the point of the rocket you’ll glue the sides of each picket butted up to each other – no overlap. I glued them together in pairs, then halves, and then finally all together. Not sure if that is the best method – my first one definitely came out better than the second.
Next you’ll cut out the base ring and glue it around the bottom of the rocket. It should go around the rocket rather than having the rocket sitting on top of it. You definitely want the base to be a ring and not a disc or it won’t fit nicely over your bra.
 Finally cut out and glue on the fins. I lined the first fin up with the seam of the foam and then matched up the others based on the checkers to make sure they were aligned.
You’ll need two rockets for the bra. I centered them over the cups as best as possible and made sure the fins were on the diagonal so they wouldn’t bump each other. I hand sewed them on with a whip-stitch and that worked very well. You could also try to hot glue them on, but I think sewing was easier, safer and less messy.
And TA DA! Rocket Bra!
Enlarging the Pattern
As I explained in the “Materials” section, this rocket worked perfectly with a 34C bra. I have not tried it with any other size bra so I can’t tell you how it will work out if you have bigger boobs. If you have smaller boobs you should be able to use the same rockets and they just might cover the cup a little more.
I’m not sure if this size rocket would work for me or not (I’m about a 34DDD). If I ever decide to make myself a pair I will update this post.
If you want to try to adjust the pattern I would make the following recommendations:
- The overlap section/bare picket can be reduced or eliminated to make the circumference of the rocket bigger by up to 2” using the 12”x18” craft foam sheet. If you need to go bigger than that you’ll need multiple sheets.
- You could adjust the dimensions of the picket template to make it the overall circumference bigger. If you do this you probably want to adjust in both width and height to keep the checkers square.
- Or you could add in more pickets to make the circumference bigger. If you are doing the checker pattern you’d need to add them in even numbers, so this would be an option if you need to go a lot larger as each picket is 2” wide in this template.
Good luck and please share your rocket bra pictures in the comments!
Disclaimer: This post includes affiliate links, and I will earn a commission if you purchase through these links. Please note that I’ve linked to these products purely because I recommend them and they are from companies I trust. There is no additional cost to you.
Related Posts


Comments (0)